Building a Docker Image
This post starts a series of articles taking a deep dive on building Docker images. But before we look at building a Docker image let’s briefly recap the essentials we need to know about container images.
A Docker image is built up from a series of layers where each layer represents an instruction in the image’s Dockerfile. When Docker materializes an image and creates a container from this image, a storage driver handles the details about the way these layers interact with each other. Different storage drivers are available, which have advantages and disadvantages in different situations (e.g. AUFS, overlay, overlay2, btrfs,zfs). All drivers have in common that they use stackable image layers and the copy-on-write (CoW) strategy for writing files.
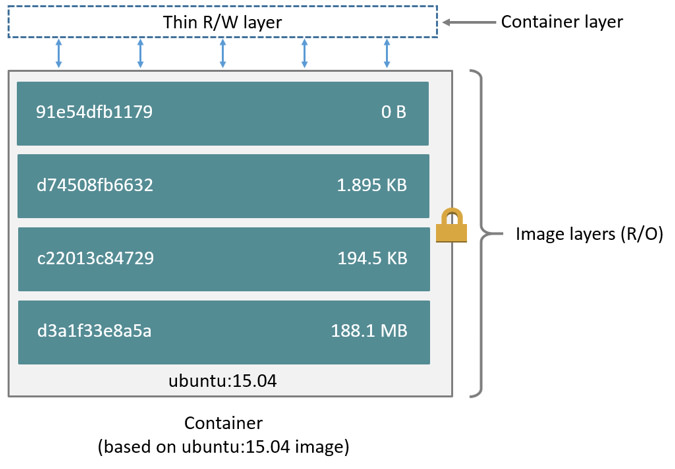
When you start a container, a thin writable container layer is added on top of the other layers. Any changes the container makes to the filesystem are stored in this layer. A container can never directly modify an image’s layer! When a container tries to modify a file the storage driver searches through the image layers for the file to update. It performs a copy_up operation on the first copy of the file that is found, to copy the file to the container’s writable layer. As CoW performance is heavily dependent on the storage driver, write heavy applications should use volumes to store data for more efficient I/O.
Not only does copy-on-write save space, but it also reduces start-up time. When you start a container (or multiple containers from the same image), Docker only needs to create the thin writable container layer. Likewise when deleting a container, only the writable layer has to be deleted.
Building an Image from a Dockerfile
A Docker image is built from a series of instructions in a Dockerfile which is processed by the docker image build command.
We are now introducing a simple Java based application which we want to run in a Docker container.
In this issue of this series of posts we will be looking just at the most basic command to build the image and the in subsequent installments dive deeper in to more complex techniques.
FROM openjdk:8-jre-alpine  (1)
LABEL maintainer='Martin Ahrer <this@martinahrer.at>' (2)
RUN mkdir /opt/app  (3)
EXPOSE 8080 (4)
CMD java -jar /opt/app/app.jar  (5)
COPY continuousdelivery.jar /opt/app/app.jar (6)| 1 | Pull in the layers of base image openjdk:8-jre-alpine |
| 2 | We can add any label (this is just metadata) |
| 3 | Run any command (this produces a layer) |
| 4 | Mark a port as candidate for port publishing (just metadata) |
| 5 | Set the container startup command (this is just metadata) |
| 6 | Add a file to the image (this produces a layer) |
Dockerfile
docker image build \
    -f Dockerfile \ (1)
    -t app \ (2)
./ (3)| 1 | The Dockerfile path (-f Dockerfile is default) |
| 2 | Assigns the tag app to the image (can also contain a version, user, and a registry URL, e.g. r.j3ss.co/img:latest) |
| 3 | The Docker build context comprises the file system content that can be copied to the image. |